
이 글은 사용자가 Front 에서 인증 완료 후 토큰을 받아 Backend 에서 Apple 로 검증 하는 방법을 설명한다.@Component class AppleKeyLocator( private val appleKeyClient: AppleKeyClient ) { fun genaratePublicK(token: String): PublicKey { val headerPart = token.substringBefore('.') val header = ObjectMapper().readValue( String(Base64.getUrlDecoder().decode(headerPart), Charsets.UTF_8), object : TypeReference<Map<String, String>>() {} ) require(header["alg"] == "RS256") { "Unsupported JWT algorithm: ${header["alg"]}" } val publicKeys = appleKeyClient.getPublicKeys() val key = publicKeys.keys.firstOrNull { it.kid == header["kid"] && it.alg == "RS256" } ?: throw IllegalArgumentException("Matching Apple Public Key not found") val modulus = BigInteger(1, Base64.getUrlDecoder().decode(key.n)) val exponent = BigInteger(1, Base64.getUrlDecoder().decode(key.e)) return KeyFactory.getInstance("RSA") .generatePublic(RSAPublicKeySpec(modulus, exponent)) } }
구성 환경
React Native(Expo) -> Expo go (x)
Spring boot
프론트에서 받아 올 것
Apple 인증을 받으려면
identityToken , authorizationCode 를 받아와야 한다.
1. 인증서 생성

인증서,ID 및 프로파일 -> 인증서 탭을 누르면 아래 화면이 나온다.

Identifiers 의 + 버튼을 누르고
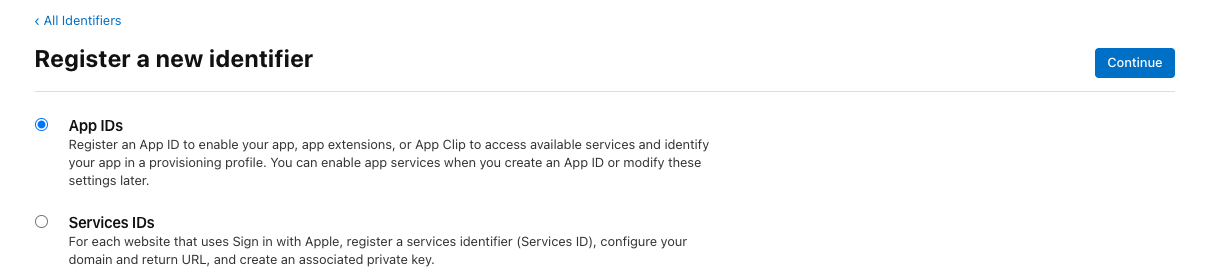
Front 의 환경이
App -> APP IDs
Web -> Services IDs
를 만들어준다.
필자는 앱 환경이기 때문에 App IDs 를 만든다.

Bundle ID 를 입력 해준다.
이 부분은 앱 패키지 ID랑은 별개이다.
보통 패키지 명(com.exam.myapp)을 사용 하는데, Services ID 와 App ID 를 구분짓기 위해,
appID.com.exam.myapp
servicesID.com.exam.myapp
로 만들기도 한다. 번들 ID 는 중복이 안됨.
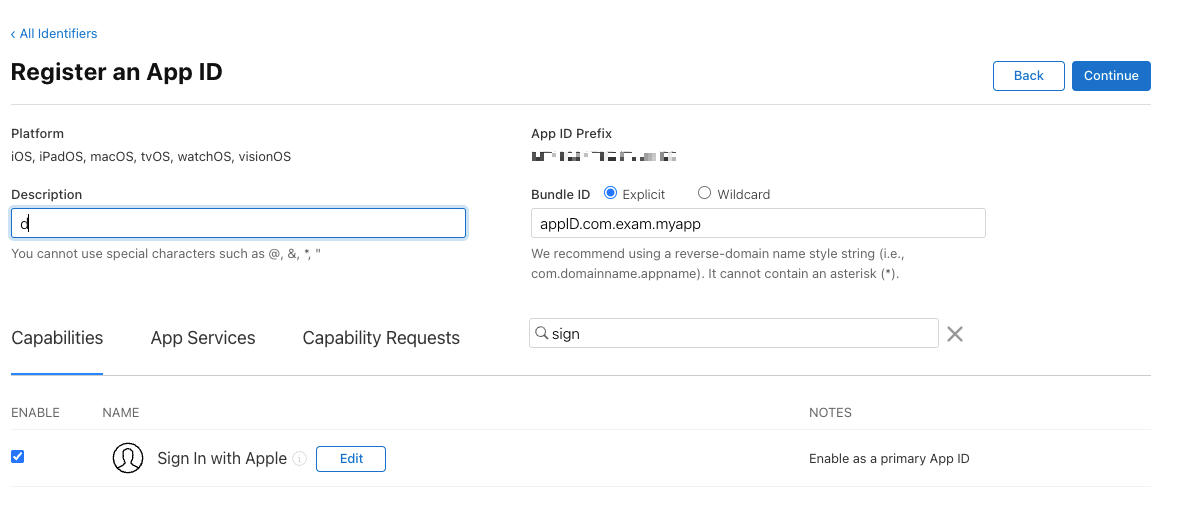
아래에 sign In with Apple 을 추가 해준다.
Edit 창에 들어가서 아래 Primary App 을 선택 해준다.


생성 완료 후,
Team ID, Bundle ID 를 기록 해두자.
2. Key 생성

아래에 Keys 탭에 + 버튼을 눌러 키를 생성해준다.
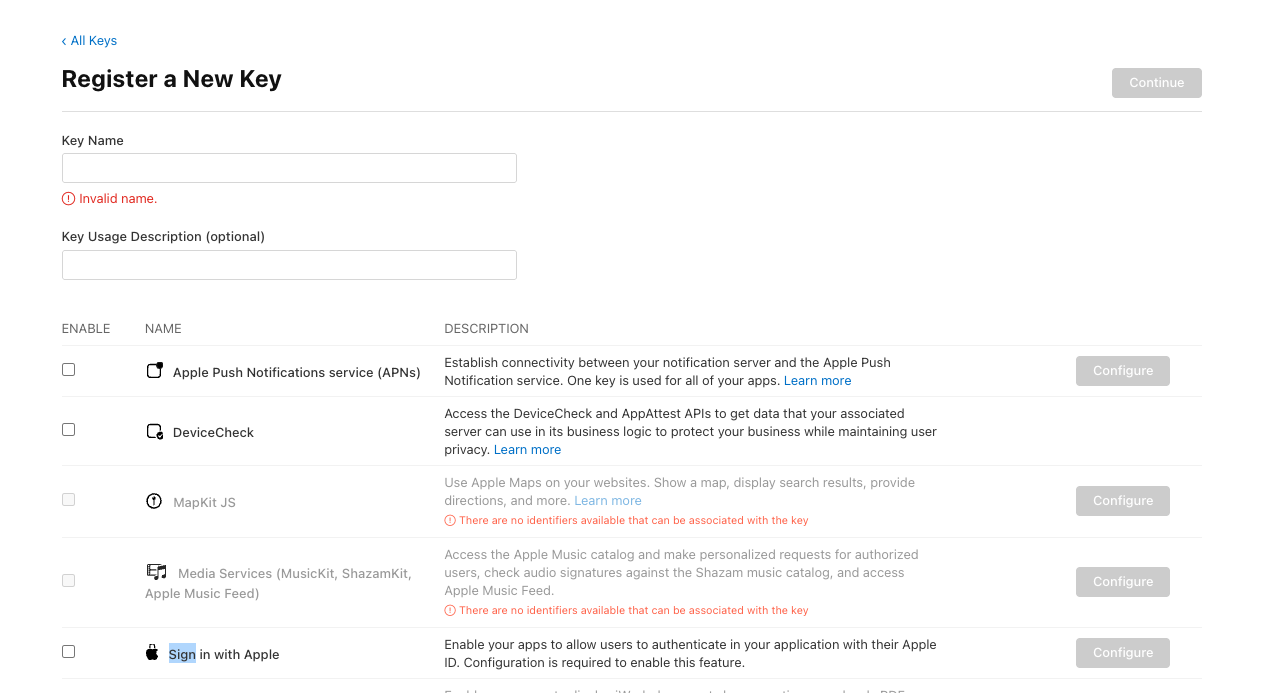
sign in with apple 을 선택하고 Configure 를 눌러 앱을 선택 해주자.
키를 만들고 Key ID 를 메모 해두자.
코드
//gradle
implementation("io.jsonwebtoken:jjwt-api:0.12.6")
implementation("io.jsonwebtoken:jjwt-impl:0.12.6")
implementation("io.jsonwebtoken:jjwt-jackson:0.12.6")Apple 은 인증 수단으로 JWT 토큰을 사용한다.
JWT 토큰을 만들어서 Apple 로 인증 받는 과정이 있음.
전체코드
// Request Dto
class OauthSignUpRequestDto(
    val token: String,
    val appleCode: String?,
)

// 전체코드
fun getEmailAndValidateToken(request: OauthSignUpRequestDto): String {
        val jwt = appleJwtUtil.generateAuthJwt()
        val code = request.appleCode ?: throw IllegalArgumentException("애플 코드가 존재하지 않습니다.")

        try {
            val response = webClient.post()
                .uri { uriBuilder ->
                    uriBuilder.path("/auth/token")
                        .queryParam("grant_type", "authorization_code")
                        .queryParam("client_id", clientId)
                        .queryParam("client_secret", jwt)
                        .queryParam("code", code)
                        .build()
                }
                .retrieve()
                .bodyToMono(AppleTokenResponseDto::class.java)
                .block() ?: throw ExternalApiErrorException("Apple token response was null")
            val claims = appleJwtUtil.extractAuthClaims(response.idToken!!)
            val identifier = claims.get("sub", String::class.java)
            return identifier

        } catch (e: WebClientResponseException) {
            log.error("[애플 로그인 실패]: ${e.responseBodyAsString}", e)
            throw e
        } catch (e: Exception) {
            log.error("[애플 로그인 실패 - 예상치 못한 오류]: ${e.message}", e)
            throw e
        }
}Jwt Token 생성 (apple 인증용)
 @Value("\${apple_identifier_bundle_id}")
    private lateinit var bundleId: String

    @Value("\${apple_team_id}")
    private lateinit var teamId: String

    @Value("\${apple_key_id}")
    private lateinit var keyId: String

    fun generateAuthJwt(): String {
        val now = System.currentTimeMillis()
        val iat = Date(now)
        val exp = Date(now + 20 * 60 * 1000)
        val privateKey = keyManager.loadPrivateKeyForApple(AppleKeyType.AUTH)

        return Jwts.builder()
            .subject(bundleId)
            .issuer(teamId)
            .issuedAt(iat)
            .expiration(exp)
            .audience()
            .add("https://appleid.apple.com")
            .and()
            .header()
            .keyId(keyId)
            .and()
            .signWith(privateKey, Jwts.SIG.ES256)
            .compact()
}위에서 저장한
BundleId, TeamId, KeyId 를 환경변수에 넣어
Jwt 토큰을 만들어준다.
토큰 인증
        val jwt = appleJwtUtil.generateAuthJwt()
        val code = request.appleCode ?: throw IllegalArgumentException("애플 코드가 존재하지 않습니다.")

        try {
            val response = webClient.post()
                .uri { uriBuilder ->
                    uriBuilder.path("/auth/token")
                        .queryParam("grant_type", "authorization_code")
                        //ClientId 는 위에서 사용한 Bundle Id가 들어간다.
                        .queryParam("client_id", clientId)
                        // 위에서 생성한 JWT 토큰
                        .queryParam("client_secret", jwt)
                        // Front 에서 받아온 authorizationCode
                        .queryParam("code", code)
                        .build()
                }
                .retrieve()
                .bodyToMono(AppleTokenResponseDto::class.java)
.block() ?: throw ExternalApiErrorException("Apple token response was null")// APPLE 응답 Dto
@JsonIgnoreProperties(ignoreUnknown = true)
data class AppleTokenResponseDto(
@JsonProperty("access_token")
val accessToken: String?,
@JsonProperty("token_type")
val tokenType: String?,
@JsonProperty("expires_in")
val expiresIn: String?,
@JsonProperty("refresh_token")
val refreshToken: String?,
@JsonProperty("id_token")
val idToken: String?
)이렇게 토큰이 실제 하는지 인증을 하면 끝난다.
APPLE 은 사용자가 이메일을 가려서 가입 할 수 있는데, 이때 사용자를 식별할만한 무언가를 만들어주어야 한다.
토큰 정보 추출
   fun extractAuthClaims(token: String): Claims {
        try {
            val key = appleKeyClient.genaratePublicK(token)
            return Jwts.parser()
                .verifyWith(key)
                .build()
                .parseSignedClaims(idToken)
                .payload
        } catch (e: ExpiredJwtException) {
            throw ExpiredJwtException(e.header, e.claims, "Apple JWT 토큰이 만료되었습니다.")
        }
}받아온 토큰으로 public Key 를 만들어준다.
@Component
class AppleKey(
    private val appleKeyClient: AppleKeyClient
) {
    fun genaratePublicK(token: String): PublicKey {
        val headerPart = token.substringBefore('.')

        val header = ObjectMapper().readValue(
            String(Base64.getUrlDecoder().decode(headerPart), Charsets.UTF_8),
            object : TypeReference<Map<String, String>>() {}
        )

        require(header["alg"] == "RS256") {
            "Unsupported JWT algorithm: ${header["alg"]}"
        }

        // !!! 애플에서 Key 를 받아와야 함. 캐시 처리를 해주자
        val publicKeys = appleKeyClient.getPublicKeys()

        val key = publicKeys.keys.firstOrNull {
            it.kid == header["kid"] && it.alg == "RS256"
        } ?: throw IllegalArgumentException("Matching Apple Public Key not found")

        val modulus = BigInteger(1, Base64.getUrlDecoder().decode(key.n))
        val exponent = BigInteger(1, Base64.getUrlDecoder().decode(key.e))

        return KeyFactory.getInstance("RSA")
            .generatePublic(RSAPublicKeySpec(modulus, exponent))
    }
}// Openfeign 을 사용하였다 webClient 를 사용해도됨
@FeignClient(name = "apple-auth", url = "https://appleid.apple.com/auth")
interface AppleKeyClient {
@GetMapping("/keys")
fun getPublicKeys(): ApplePublicKeysResponse
}data class ApplePublicKeysResponse(
val keys: List<ApplePublicKeyResponseDto>
) {
data class ApplePublicKeyResponseDto(
val kty: String, // Key Type (예: RSA)
val kid: String, // Key ID
val use: String,
val alg: String,
val n: String, // Modulus (Base64 URL-safe)
val e: String // Public Exponent (Base64 URL-safe)
)
}받아오면 키 조합들이 응답으로 오는데, 이 조합으로 온 키 중 RS256 을 사용하여 Public Key 를 만들어준다.

Claims 를 까보면 위와 같이 되어 있는데, 이 중
"Sub" 로 유저의 고유의 값을 처리 해주면 된다.
'개-발 > Java + Spring + Kotlin' 카테고리의 다른 글
| [Spring] chatGpt api 연동 (0) | 2025.09.18 |
|---|---|
| [Spring] itemReader 에서 ReadOnly DB 읽기 (0) | 2025.09.05 |
| [spring] React Native FCM 푸시 알림 구현 (f.Kotlin) (0) | 2025.08.20 |
| [Spring] storekit2 / expo 인 앱 아이템 구매 확인 구현 3 (AOS) (0) | 2025.08.07 |
| [Spring] storekit2 / expo 인 앱 아이템 구매 확인 구현 2 (IOS) (2) | 2025.08.07 |