
백엔드
fun verify(dto: PurchaseRequestDto, authObject: AuthObject): PurchaseResponseDto {
    val customerId = authObject.getAndValidCustomerId()
    when (dto.type) {
        PlatformType.GOOGLE -> verifyGoogle(dto, customerId)
        PlatformType.APPLE -> verifyApple(dto, customerId)
        else -> throw IllegalArgumentException("지원하지 않는 플랫폼입니다: ${dto.type}")
    }
    return PurchaseResponseDto(dto.packageType)
}App 에서 넘어온 플랫폼으로 분기를 준다.
Apple
private fun verifyApple(request: PurchaseRequestDto, customerId: String) {
        if (repository.existsById(request.transactionId)) {
            throw InvalidRequestException("이미 사용된 결제 요청입니다.")
        }

        val url = if (request.environment == "DEVELOPMENT") {
            "https://api.storekit-sandbox.itunes.apple.com/inApps/v2/history/${request.transactionId}"
        } else {
            "https://api.storekit.itunes.apple.com/inApps/v2/history/${request.transactionId}"
        }
        val privateKey = loadPrivateKeyForApple()

        val jwt = jwtUtil.generateAppleJwt(privateKey)

      	val response = webClient
            .get()
            .uri(url)
            .header("Content-Type", "application/json")
            .header("Authorization", "Bearer $jwt")
            .retrieve()
            .bodyToMono(AppleInAppPurchaseResponse::class.java)
            .onErrorResume { Mono.error(it) }
            .block()

        if (response?.bundleId != appleIAPBundleId){
            throw InvalidRequestException("유효하지 않은 결제 요청입니다. :Apple - Bundle ID 불일치")
        }

        val jwsList = response.signedTransactions

        val decodingToken = jwsList.map {
            decodeAppleJws(it)
        }
        val currentTransaction = decodingToken.find { it.originalTransactionId == request.transactionId }
            ?: throw InvalidRequestException("유효하지 않은 결제 요청입니다. :Apple")

            savePurchase(
            transactionId = currentTransaction.transactionId!!,
            customerId = customerId,
            type = ProductPackage.valueOf(currentTransaction.productId?.uppercase() ?:throw InvalidRequestException("유효하지 않은 결제 요청입니다. :Apple"))
        )
}App 에서 받아온 트랜잭션Id 를 통해, 해당 트랜잭션의 정보를 받아온다.
    //Sandbox (개발환경)
    "https://api.storekit-sandbox.itunes.apple.com/inApps/v2/history/${request.transactionId}"
    //Production (운영환경)
"https://api.storekit.itunes.apple.com/inApps/v2/history/${request.transactionId}"각 환겨에 맞게 위 주소로 요청을 보내주도록 하자.
트랜잭션Id 를 검증할 때 jwt 토큰을 만들어서 헤더에 넣어서 보내주어야 한다.
create 인증토큰 - JWT
만들기전 PrivateKey 를 만들어주어야 한다.
privateKeyPem 채집 방법은 아래에 설명한다.
private fun loadPrivateKeyForApple(): PrivateKey {
    val privateKeyPemFormatted = privateKeyPem
        .replace("-----BEGIN PRIVATE KEY-----", "")
        .replace("-----END PRIVATE KEY-----", "")
        .replace("\\s".toRegex(), "")

    val keyBytes =
        Decoders.BASE64URL.decode(privateKeyPemFormatted)
    val keySpec = PKCS8EncodedKeySpec(keyBytes)
    val keyFactory = KeyFactory.getInstance("EC")
    return keyFactory.generatePrivate(keySpec)
}사인에 필요한 privateKey 를 만들어 준 후 토큰을 생성하러 ㄱㄱ~
  val privateKeyPem: String by lazy {
        val resource = ClassPathResource("keys/iap-key.p8")
        require(resource.exists()) { "private_key.p8 파일이 존재하지 않습니다." }
        resource.inputStream.bufferedReader(Charsets.UTF_8).use { it.readText() }
    }

fun generateAppleJwt(
        secretKey : PrivateKey
    ): String {
        val now = System.currentTimeMillis()
        val iat = Date(now)
        val exp = Date(now + 20 * 60 * 1000)

        val alg = Jwts.SIG.ES256
        val audience = "appstoreconnect-v1"

        return  Jwts.builder()
            .header()
            .add("alg", "ES256")
            .add("kid", appleIAPKey)
            .add("typ", "JWT")
            .and()
            .issuer(appleIssuer)
            .setAudience(audience)
            .issuedAt(iat)
            .expiration(exp)
            .claim("bid", appleIAPBundleId)
            .signWith(secretKey, alg)
            .compact()
}토큰을 생성할때는
IAPKey, issuer, bundleId 가 필요하다.
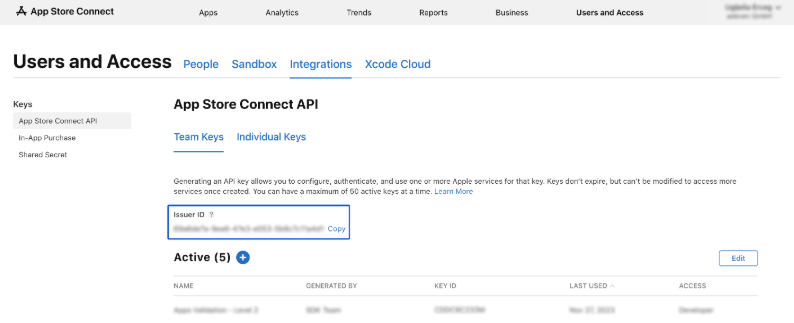
Issuer
Connect > Users and Access > integrations(통합) > 앱 내 구입
홈 > 사용자 및 액세스 > 통합 > 앱 내 구입 에 탭에 팀 키를 생성 하면 Issuer Id 를 얻을 수 있다.

앱 내 구입 + 버튼을 눌러 키를 생성한다.
생성된 키를 다운받은 후 저장을 해둔다. ( 위에서 설명한 privateKeyPem 가 된다.)
아래에 사진에 보이는 IssuerId(issuer) 와 Key Id(IAPKey) 부분을 복사를 해둔다.
https://developer.apple.com/documentation/appstoreconnectapi/generating-tokens-for-api-requests
Generating Tokens for API Requests | Apple Developer Documentation
Create JSON Web Tokens (JWTs) signed with your private key to authorize API requests.
developer.apple.com
모든 재료를 구했으면, Jwt 토큰 코드에 각각 넣는다.
트랜잭션 검증
  val response = webClient
            .get()
            .uri(url)
            .header("Content-Type", "application/json")
            .header("Authorization", "Bearer $jwt")
            .retrieve()
            .bodyToMono(AppleInAppPurchaseResponse::class.java)
            .onErrorResume { Mono.error(it) }
            .block()

        response ?: throw InvalidRequestException("조회된 결제 내역이 없습니다. :Apple ")

data class AppleInAppPurchaseResponse(
    @JsonProperty("appAppleId")
    val appAppleId: String?, // App Store의 앱 고유 식별자

    @JsonProperty("bundleId")
    val bundleId: String?, // 앱의 번들 식별자

    @JsonProperty("environment")
    val environment: String?, // 서버 환경: "Sandbox" 또는 "Production"

    @JsonProperty("hasMore")
    val hasMore: Boolean?, // App Store에 더 많은 트랜잭션 데이터가 있는지 여부

    @JsonProperty("revision")
    val revision: String?, // 다음 트랜잭션 세트를 요청할 때 사용하는 토큰

    @JsonProperty("signedTransactions")
    var signedTransactions: List<String> // JWS 형식으로 서명된 트랜잭션 정보 목록
)응답이 넘어온다.
signedTransactions 에는 여러가지 트랜잭션이 넘어온다. 그 중 유효한 트랜잭션을 필터링 해주어야 한다.
val jwsList = response.signedTransactions

val decodingToken = jwsList.map {
    decodeAppleJws(it)
}signedTransactions 에는 JWS 시큐리티 토큰이 넘어오는데 이것을 디코딩을 해주어야 한다.
private fun decodeAppleJws(token: String): AppleConsumableJwsPayload {
    val parts = token.split(".")
    require(parts.size == 3) { "잘못된 JWS 형식입니다." }

    val payloadBase64 = parts[1]
    val payloadJson = String(Base64.getUrlDecoder().decode(payloadBase64), Charsets.UTF_8)

    println(payloadJson)
    val mapper = jacksonObjectMapper()
    return mapper.readValue(payloadJson, AppleConsumableJwsPayload::class.java)
}

@JsonIgnoreProperties(ignoreUnknown = true)
data class AppleConsumableJwsPayload(
    val type: String?,
    val deviceVerificationNonce: String?,
    val quantity: Int?,
    val originalPurchaseDate: Long?,
    val transactionReason: String?,
    val storefrontId: String?,
    val price: Int?,
    val transactionId: String?,
    val storefront: String?,
    val inAppOwnershipType: String?,
    val environment: String?,
    val signedDate: Long?,
    val productId: String?,
    val deviceVerification: String?,
    val bundleId: String?,
    val currency: String?,
    val purchaseDate: Long?,
    val originalTransactionId: String?,
    val appTransactionId: String? = null
)AppleConsumableJwsPayload 페이로드에서 현재 트랜잭션의 JWS 를 찾아오고,
트랜잭션ID 를 저장해서, 처리된 트랜잭션임을 DB 에 저장해주자.....
ios 결제 끝 ~
'개-발 > Java + Spring + Kotlin' 카테고리의 다른 글
| [spring] React Native FCM 푸시 알림 구현 (f.Kotlin) (0) | 2025.08.20 |
|---|---|
| [Spring] storekit2 / expo 인 앱 아이템 구매 확인 구현 3 (AOS) (0) | 2025.08.07 |
| [kotlin] 슬랙 봇 연동하기 (0) | 2025.06.20 |
| [spring] read , write 분리하기 (DB Replication) (0) | 2025.06.12 |
| [Kotlin] 웹 크롤링 지연 후 가져오기 (0) | 2025.05.19 |