
IOS 인 앱 아이템 체크리스트
https://soobysu.tistory.com/227
[App] ios 인 앱 아이템 조회 실패 ( ios 인 앱 결제 체크리스트 )
problemios 인 앱 아이템을 가져오려고 하는데 안가져와지는 문제가 발생했다.코드상에서는 문제가 없어 보임. -> 안드로이드는 잘 가져와짐solutionios 에서는 인 앱 결제 테스트 전 체크해야 할 것들
soobysu.tistory.com
위 사항을 한번 읽어보고 진행 하도록 하자
AOS 인 앱 아이템 체크리스트
https://soobysu.tistory.com/229
[App] android 인 앱 아이템 사전 준비
앱 내 구입을 등록 하려면 수익 창출 설정을 등록 해놔야 한다.Google Cloud Platform(GCP) 프로젝트를 등록 하고, Cloud Pub/Sub에서 주제를 설정해야 합니다. GCP 주제 생성 https://cloud.google.com https://cloud.goog
soobysu.tistory.com
인 앱 아이템 등록
ios

수익화 탭 -> 앱 내 구입 접속 후
아래 파란색 + 를 누른 후 추가 해준다
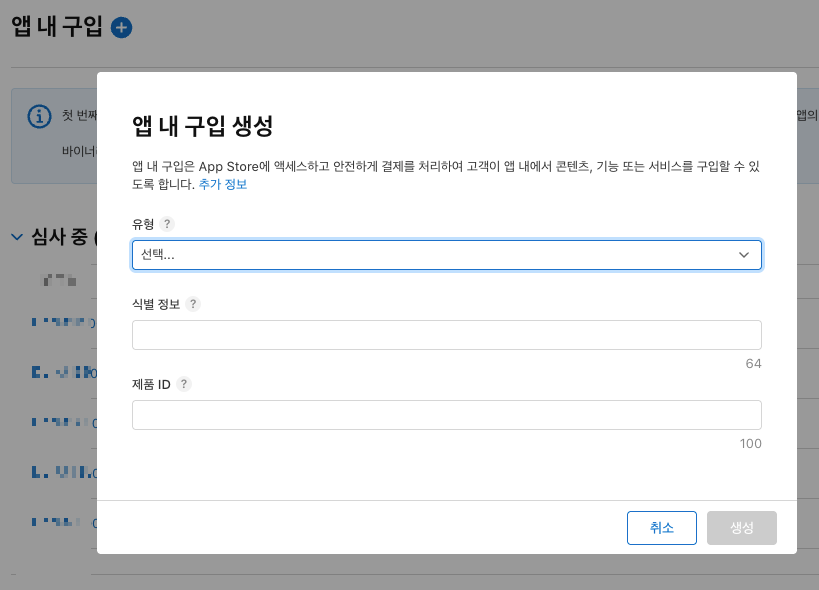
제품 ID 는 생성하면, 지우더라도 다시 생성 못한다.
여담이지만 ...
인 앱 아이템 심사 거절 당해서, 제품 ID를 삭제 했더니 다시 생성을 못한 경험이 있다 .....
android

play 를 통한 수익 창출 > 인앱 상품 > 상품만들기 버튼
코드 구현
구매초기화 -> 플랫폼에서 구매 가능한 제품ID 받아오기 -> 구매 (구매 팝업창) ->
구매 완료 ( 영수증ID , 트랜잭션ID) -> 영수증 검증(서버)
이러한 프로세스를 가지고 있다.
https://expo-iap.hyo.dev/docs/intro/
Expo IAP
Expo IAP is a powerful in-app purchase solution for Expo and React Native applications. It provides a unified API for handling in-app purchases across iOS and Android platforms with comprehensive error h### 📚 Guides
expo-iap.hyo.dev
npm install expo-iap위 라이브러리를 사용하여 인 앱 아이템 검증을 하는 시나리오를 작성하려고 한다.
초기화
// 초기화
async initialize() {

    if (this.isInitialized) {
      return;
    }

    try {
      await initConnection();
      this.setupListeners();
      this.isInitialized = true;

    } catch (error) {

      showToast("error", "결제 오류", "결제 시스템 초기화에 실패했습니다.");
      throw error;
    }
}제품ID 불러오기
async getProducts(productIds: string[]): Promise<Product[]> {
if (!this.isInitialized) {
  await this.initialize();
}
try {
  return await getProducts(productIds);
} catch (error) {
  showToast('error', '결제 오류', '결제 상품 조회 중 오류가 발생했습니다.');
  throw error;
}
}
이런 식으로 응답이 오는데 만약 ProductId 가 아무것도 안 받아온다면,
맨 위에 있는 체크리스트를 확인해 보자 -> 인 앱 아이템을 등록 하자마자 조회가능 함.
필자는 인 앱 아이템 승인 후 조회 되는 줄 알고 한참 해맴 ㅜㅠ
구매하기
 async purchaseProduct(productId: string): Promise<void> {
    try {
      if (!this.isInitialized) {
        showToast("info", "결제 초기화", "결제 시스템을 초기화하고 있습니다.");
        await this.initialize();
      }

      await this.platformSpecificPurchaseRequest(productId);

    } catch (error) {
      if (error instanceof Error && error.message.includes('E_USER_CANCELLED')) {
        return;
      }

      const errorMessage = "결제 요청 중 오류가 발생했습니다.";
      showToast("error", "결제 실패", errorMessage);
    }
  }

  private async platformSpecificPurchaseRequest(productId: string) {
    if (Platform.OS === 'ios') {
      await requestPurchase({ request: { sku: productId } ,type: 'inapp'});
    } else {
      await requestPurchase({ request: { skus: [productId] } ,type: 'inapp'});
    }
  }
위에서 받아온 제품ID 로 구매 버튼을 누르면 트리거 될 수 있게 만들어준다.
구매 완료 처리 및 백엔드로 영수증 검증 요청
  async (purchase: ProductPurchase) => {
          const transactionId = this.getTransactionId(purchase);

          // 1. 먼저 트랜잭션 완료 처리 (Google Play에서 제거)
          await finishTransaction({
            purchase,
            isConsumable: true
          });
          console.log(`[PurchaseService] 트랜잭션 완료: ${transactionId}`);

          // 2. 그 다음 백엔드 검증 처리
          const verificationSuccess = await this.handlePurchaseCompletion(purchase);

          if (verificationSuccess) {
            this.showPurchaseSuccessToast(purchase.id, purchase);
          } else {
            showToast("error", "결제 실패", "결제 검증에 실패했습니다.");
          }
}트랜잭션을 완료 처리 후 백엔드로 보내준다.
백엔드에서 안드로이드 (play store)영수증을 검증할 때, 해당 트랜잭션이 끝난건지 확인을 하기 때문.
꼭 닫아주자!
주의 할 점
android 는 배열로 보내야 한다.
거래를 시작한 트랜잭션은 반드시 종료를 해줘야 한다. -> 종료 안된 거래 내역 재요청으로 들어오게 됌.
productId 조회 -> 구매 요청 -> 트랜잭션 ID 백엔드 전송 -> (백엔드) 트랜잭션ID 검증 및 아이템 증가
백엔드에 넘겨줄 데이터 세팅
 private async handlePurchaseCompletion(purchase: ProductPurchase): Promise<boolean> {
    const transactionId = this.getTransactionId(purchase);

    // 이미 처리중이거나 완료된 트랜잭션인지 다시 한번 확인
    if (this.processingTransactions.has(transactionId)) {
      console.log(`[PurchaseService] 트랜잭션 ${transactionId}은 이미 처리중입니다. 건너뜀.`);
      return false;
    }

    if (this.processedTransactions.has(transactionId)) {
      console.log(`[PurchaseService] 트랜잭션 ${transactionId}은 이미 처리 완료되었습니다. 건너뜀.`);
      return true; // 이미 성공적으로 처리되었으므로 true 반환
    }

    try {
      this.processingTransactions.add(transactionId);
      console.log(`[PurchaseService] 트랜잭션 처리 시작: ${transactionId}`);

      const receiptData: ReceiptVerificationRequest = {
        packageType: purchase.id.toUpperCase(),
        receiptId: '',
        type: Platform.OS === 'ios' ? 'APPLE' : 'GOOGLE',
        transactionId: transactionId,
        environment: 'DEVELOPMENT'
      };

      if (Platform.OS === 'ios') {
        const iosPurchase = purchase as any;
        receiptData.environment = iosPurchase.environment !== 'Production' ? 'DEVELOPMENT' : 'PRODUCTION';
      } else {
        const androidPurchase = purchase as AndroidPurchase;

        // transactionReceipt JSON 파싱
        const parsedReceipt = this.parseAndroidTransactionReceipt(androidPurchase.transactionReceipt);
        receiptData.environment = 'PRODUCTION';
        receiptData.receiptId = parsedReceipt?.purchaseToken || '';
      }

      if (!receiptData.receiptId) {
        console.error('[PurchaseService] 유효한 영수증 또는 토큰을 얻지 못했습니다.');
        showToast("error", "결제 실패", "영수증 정보를 가져올 수 없습니다.");
        return false;
      }

      const success = await this.sendReceiptToBackend(receiptData);

      if (success) {
        // 백엔드 검증 성공 후 자산 상태 업데이트
        this.processedTransactions.add(transactionId);
        await useAssetsStore.getState().updateAssets();
        console.log(`[PurchaseService] 백엔드 검증 및 자산 업데이트 완료: ${transactionId}`);
      } else {
        // 백엔드 검증 실패 (이미 finishTransaction은 완료된 상태)
        this.failedTransactions.add(transactionId);
        console.log(`[PurchaseService] 백엔드 검증 실패: ${transactionId}`);
      }

      return success;

    } catch (error) {
      console.error(`[PurchaseService] ${Platform.OS}에서 구매 완료 처리에 실패했습니다:`, error);
      this.failedTransactions.add(transactionId);
      // 이미 finishTransaction은 완료된 상태이므로 추가 처리 불필요
      return false;
    } finally {
      this.processingTransactions.delete(transactionId);
      console.log(`[PurchaseService] 트랜잭션 처리 종료: ${transactionId}`);
    }
}Google 은 transactionId 와 token 이 필요하고,
Apple 은 transactionId 가 필요하다.
// 안드로이드 구매 완료 후 넘어오는 값
interface AndroidTransactionReceipt {
  orderId: string;
  packageName: string;
  productId: string;
  purchaseTime: number;
  purchaseState: number;
  purchaseToken: string;
  quantity: number;
  acknowledged: boolean;
}

// Android 구매 정보 타입
interface AndroidPurchase {
  developerPayloadAndroid: string;
  id: string;
  ids: string[];
  isAcknowledgedAndroid: boolean;
  obfuscatedAccountIdAndroid: string;
  obfuscatedProfileIdAndroid: string;
  orderId: string;
  packageNameAndroid: string;
  platform: string;
  purchaseStateAndroid: number;
  purchaseTokenAndroid: string;
  signatureAndroid: string;
  transactionDate: number;
  transactionId: string;
  transactionReceipt: AndroidTransactionReceipt;
}

// 백엔드 영수증 검증 API 요청 타입
interface ReceiptVerificationRequest {
  packageType: string;
  receiptId: string; // 안드로이드의 토큰을 넣어줄 곳
  type: 'APPLE' | 'GOOGLE';  // 플랫폼 타입
  transactionId: string;
  environment: 'DEVELOPMENT' | 'PRODUCTION'; //애플 Sandbox(개발환경)은 요청 주소가 다름
}백엔드로 요청을 보낸다.
백엔드는 다음장으로 ..
https://soobysu.tistory.com/231
[Spring] storekit2 / expo 인 앱 아이템 구매 확인 구현 2
백엔드fun verify(dto: PurchaseRequestDto, authObject: AuthObject): PurchaseResponseDto { val customerId = authObject.getAndValidCustomerId() when (dto.type) { PlatformType.GOOGLE -> verifyGoogle(dto, customerId) PlatformType.APPLE -> verifyApple(dto, cu
soobysu.tistory.com
'개-발 > App' 카테고리의 다른 글
| [App] React Native FCM 푸시 알림 세팅 (ios) (0) | 2025.08.20 |
|---|---|
| [App] ios APN (.p8) 인증키 발급받기 (0) | 2025.08.20 |
| [App] 앱 배포시 유용한 사이트 모음 (2) | 2025.08.14 |
| [App] android 인 앱 아이템 사전 준비 (0) | 2025.08.06 |
| [App] ios 인 앱 아이템 조회 실패 ( ios 인 앱 결제 체크리스트 ) (0) | 2025.07.17 |